

TabellenFaktura for Excel · Manual
Configure the Excel folder
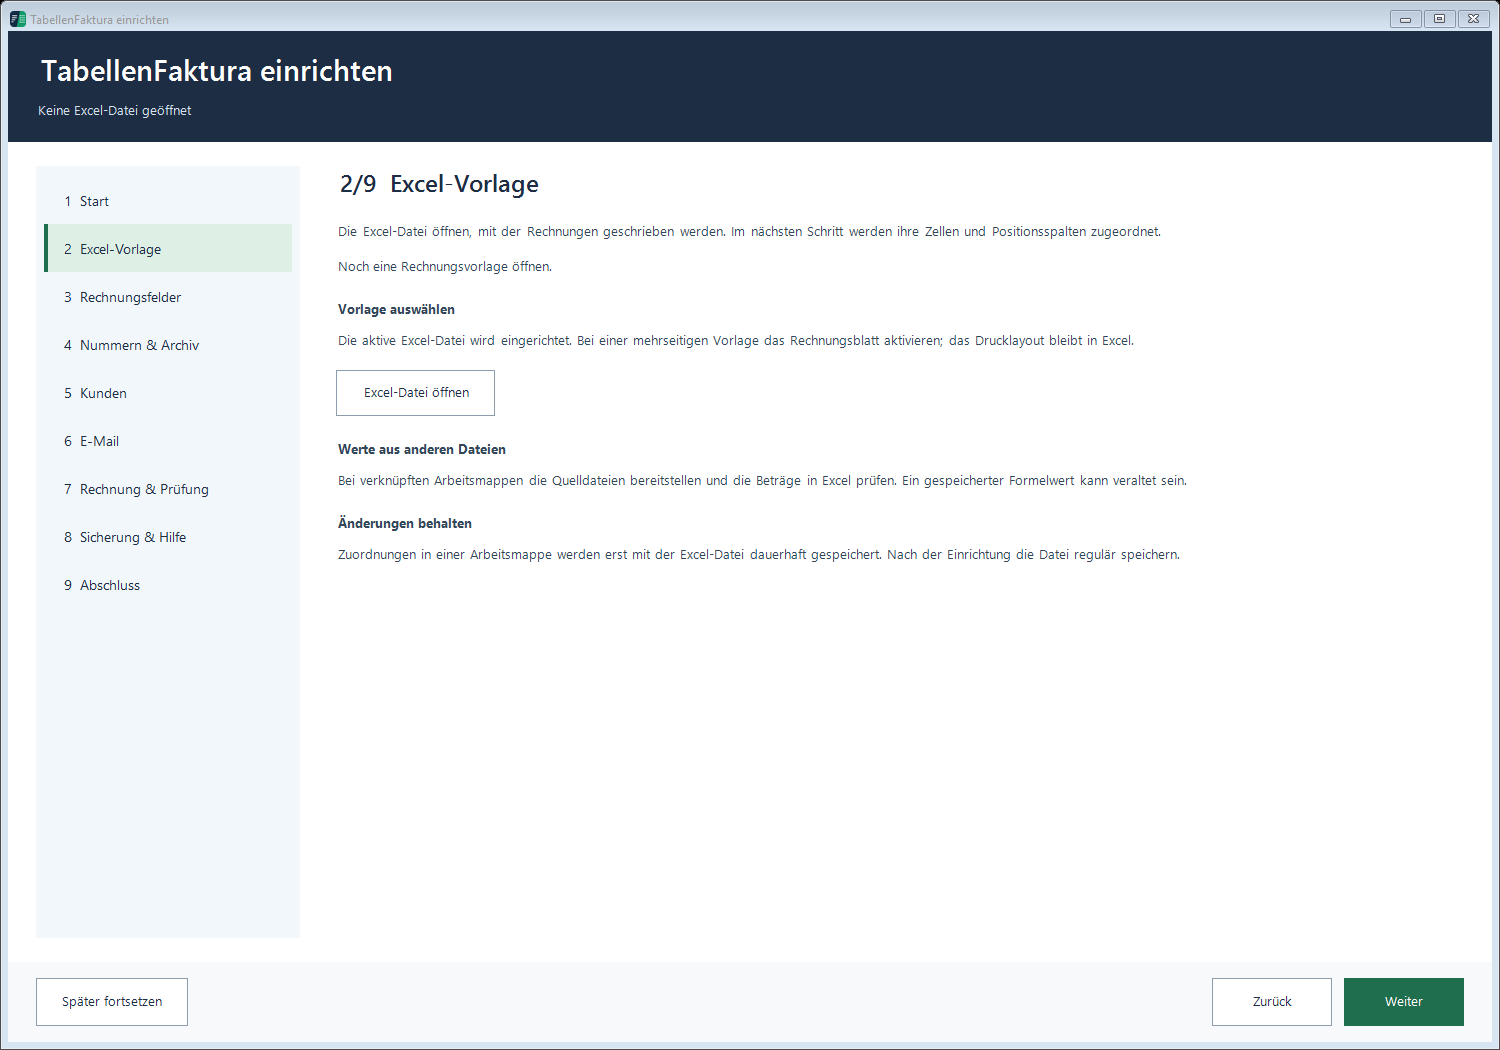
An assignment determines from which cells TabellenFaktura reads the invoice data. The appearance of the invoice remains in Excel.
Use the guided device
If the invoice is not yet set up, the setup wizard will open in the visible Excel session. e-invoice → Help → Setup it can be reopened at any time. Started steps can be continued.
- Check start and existing setup.
- Open the Excel template and select the billing sheet.
- Assign accounting fields and position columns.
- Set the number circle and archive.
- Set up customer management if necessary.
- Set up Outlook and email templates if required.
- Check a completed invoice.
- Get to know the safety and help.
- Check the device and complete it.
Customer management and Outlook are optional. Lack of mandatory assignments are specifically named. The setup check does not replace the check of each completed invoice. Field aids appear when staying with the mouse or via F1 in the selected field. The following sections explain the individual settings.
1. Start working with a working copy
Either the Download Model Account The model invoice provided contains only examples of the information provided, which will be replaced in full before a real invoice.
- Save the mappe locally, open in Excel and activate the invoice sheet.
- Prepare seller data, address, tax details, bank details and later changeable buyer data.
- Control formulas for positions, net, VAT and total amount.
- The File → Print check which pages Excel will output.
A template without macros can be .xlsx existing macros need a suitable format such as .xlsm; more is in the chapter Macros.
2. Assign fields
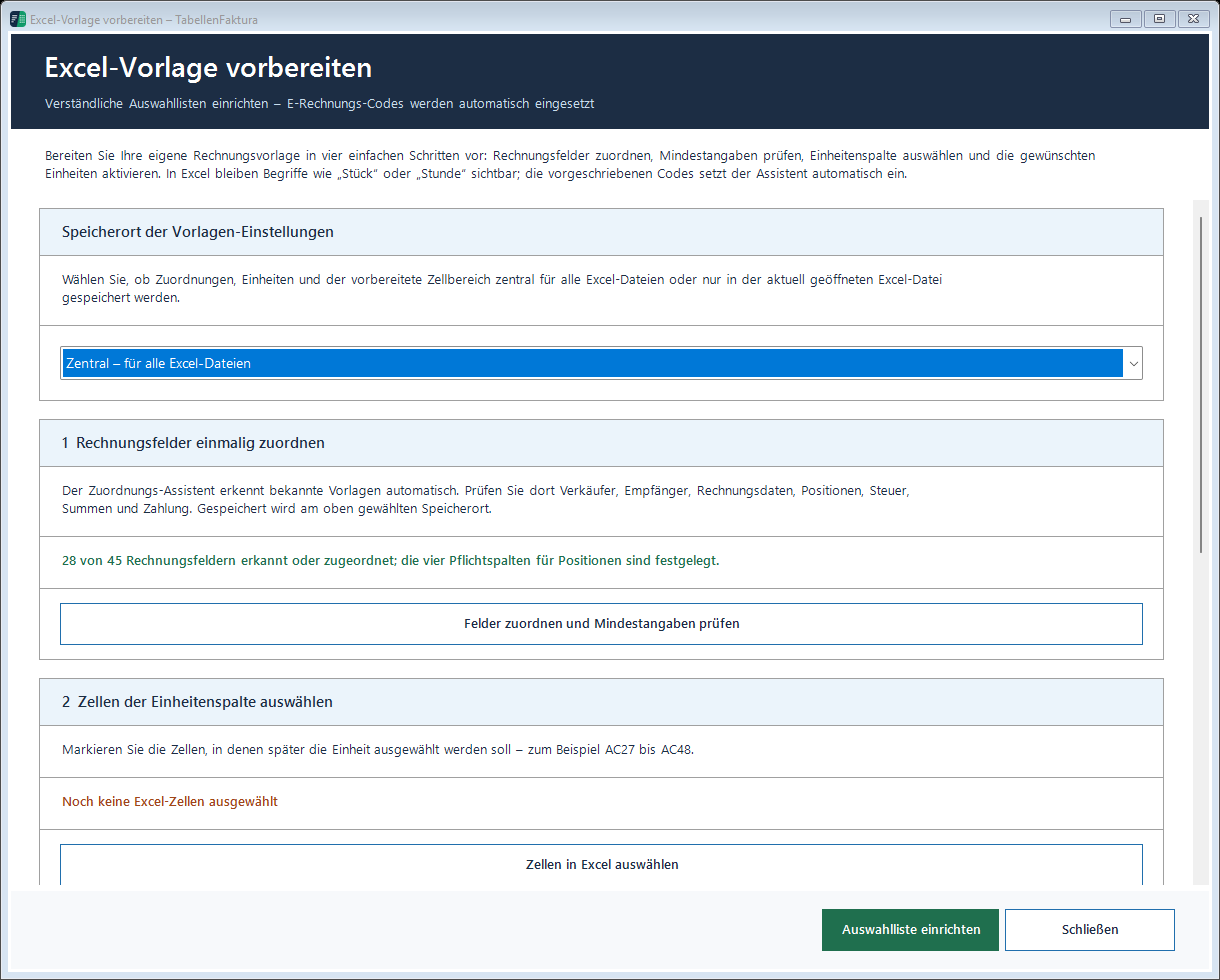
- e-invoice → Preparing your own Excel template → Excel template and the
- Select the location consciously: Central suitable for a uniform layout on this PC. Only in this Excel file keeps the settings for the respective mappe and is useful for different templates.
- Assign fields and check minimum information and the
- The areas General, Seller, Buyer, Positions, VAT, Sums, Payment and if necessary Invoices The
Select, connect a cell via "From Excel
- The appropriate field Select from Excel click.
- In the Excel folder, select the cell with the actual value and confirm the selection. For example, select the number for the invoice number itself, not the heading "Invoice number,.
- Check the value and the shown cell reference in the wizard.
- Repeat the process for all required fields.
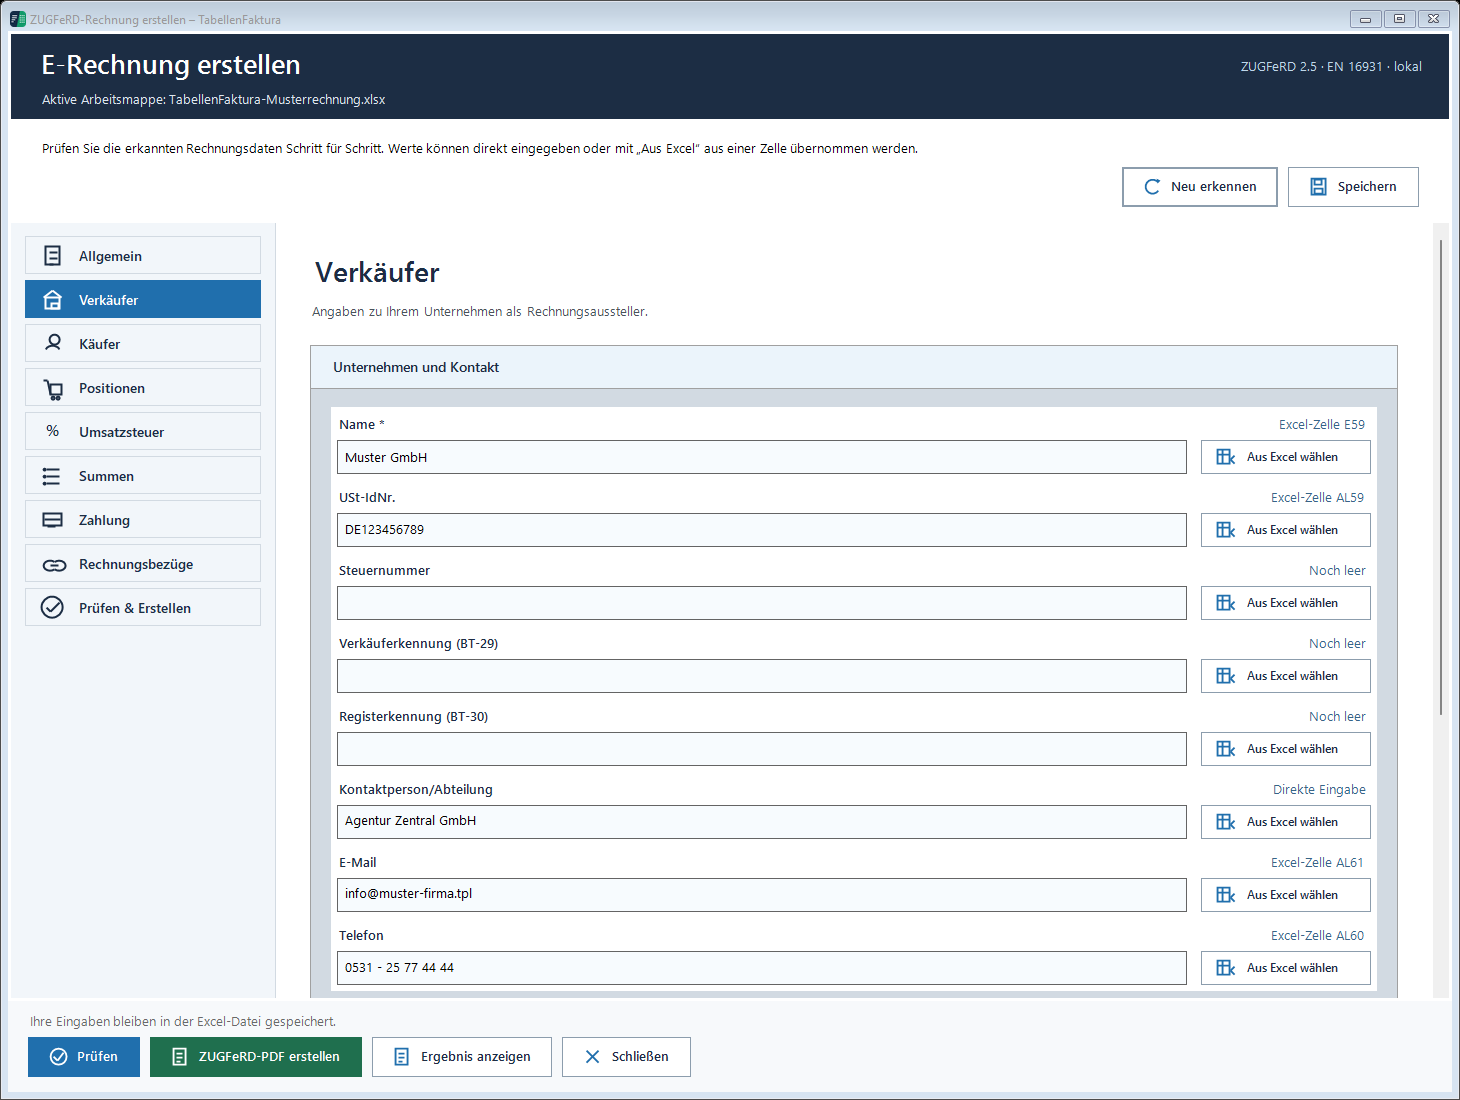
Direct input This type of input does not automatically change the visible Excel cells or the print layout. For changing values such as buyers, date and amount, cell assignments are the better basis. For changes, PDF view and structured data must match.
Information in logos, images, printhead and printfoot is not read as invoice fields alone. These data are also provided in cells or are specifically recorded in the assistant. In connected cells, assign the left upper cell of the composite.
3. Set position range and columns
The Line items First, the first and last position line are set. Alternatively, a range or a designated area can be specified. Then, the columns are assigned:
| Information | What is assigned |
|---|---|
| Article | The column with the complete service or article description. |
| Quantity | The actual number, duration or quantity. |
| Unit | The unit column or explicitly a fixed unit for all positions, for example piece, hour, meter or lump sum. |
| Net price per unit | The unit price excluding VAT, not the total amount of the line. |
| VAT rate/tax category | In the case of a mixed tax rate, the rate is fixed at the rate of the tax. |
| Article No | The article ID is yours. |
| Total price for the test | The net amount of the counter-checking line calculated in Excel. |
Here are Columns The H or AINo invoices. Select column from Excel takes over the column by selecting a matching cell. Recognised positions check that all services and the right quantities and prices appear.
Automatic detection is a suggestion. After inserting new lines or for foreign layouts, check the area again. Multiple print pages and separate position blocks are described separately.
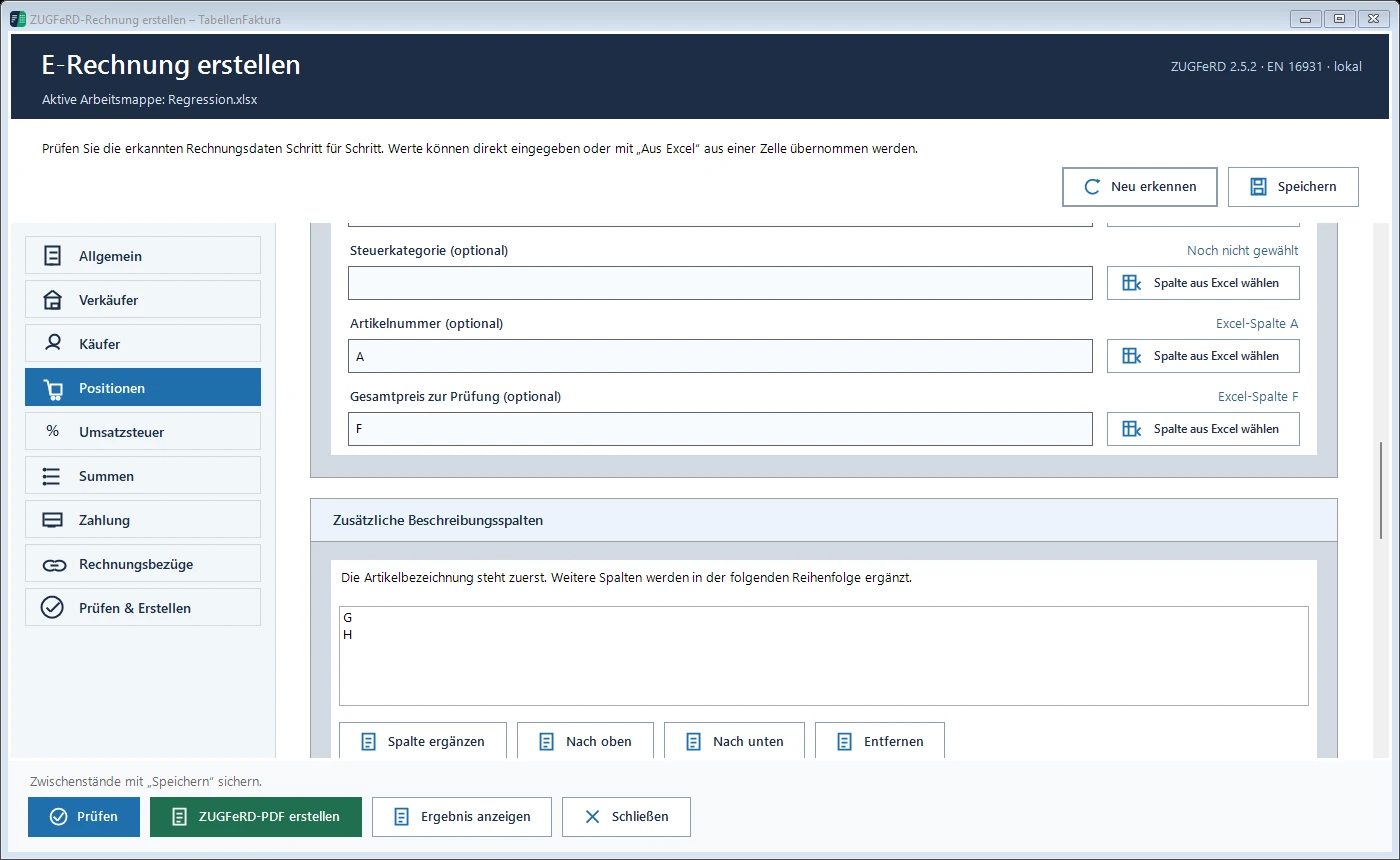
Combine several description columns
Under “Items → Additional description columns”, add further text columns to the item description. The main item description comes first. Additional columns are appended in the displayed order.
Use “Add column”, “Move up”, “Move down” and “Remove” to choose and arrange columns. Select “Join with line breaks” or “Join with spaces” for the separator.
Check the full item preview to ensure that all description parts belong to the correct service. Existing continuation text before or after the priced row can still be assigned. The visible Excel invoice and the structured description must agree.
Keep mappings when the template changes
After mapping the item range and columns, choose “Secure references”. TabellenFaktura creates visible Excel defined names so that Excel can adjust the secured references when rows and columns are inserted. Existing unambiguous defined names are preferred when selecting cells.
Save the mappings and the Excel file. After changing the sheet structure, choose “Check references”, then check the item range, every column and the full item preview. Reassign missing or deleted references using the Excel selection and secure them again.
“Release references” removes the secured column mappings. Column letters can then be edited directly again. The item range is selected separately.
4. Set unit and text updates
A fixed unit or a split unit
If all positions use the same unit, below Positions → Unit and textual updates the option A fixed unit for all positions and select the unit. No additional Excel column is required. You will be notified if existing units differ.
For different units, assign the appropriate Excel column and do not use a fixed unit. For this column, the template preparation can set up a selection list:
- Select cells in Excel select and select only the input cells of the unit column, for example
AC27:AC48. - Activate the required units, about piece, hour and lump sum.
- Configure Selection List The
A flat-rate performance also requires a suitable unit. TabellenFaktura translates the understandable terms into the intended unit codes.
Descriptions over several lines
The Description of performance choose consciously: Only the price line, Text lines before the price line or Text lines after the price line. Thus, pure description texts can be assigned to the corresponding price line. From this no invented quantities or prices. Unarranged texts and the complete description of each recognized position before saving control.
5. Check minimum details and save template
Check minimum information shows missing assignments. Click on hints and add the affected fields. Save Assignments and then save the Excel file. A template may still contain placeholders; for a final invoice, real, complete information must be entered.
Keep the mappe as the original template. Create a working copy for each new invoice. Assignments that were only stored in the mappe are retained when a complete file copy is made; simply copying individual cells does not replace it.
6. Prepare email account and message
New email profiles use HTML. An explicitly saved plain-text setting is retained. If the Outlook default produces Rich Text, the invoice draft is prepared as HTML. Check the format, signature and attachment in the opened draft.
- Configure classic Outlook with the intended email account and open it once regularly.
- e-invoice → Email → Email Settings The
- Set the storage centrally or only for the current Excel file.
- The desired E-mail account select; if necessary Reload Accounts The
- E-mail format select: default Outlook format, HTML or Text only.
- Let the matching Outlook signature be selected automatically, select an existing signature, or No signature The
- Edit subject and message text, check preview and Save Settings The
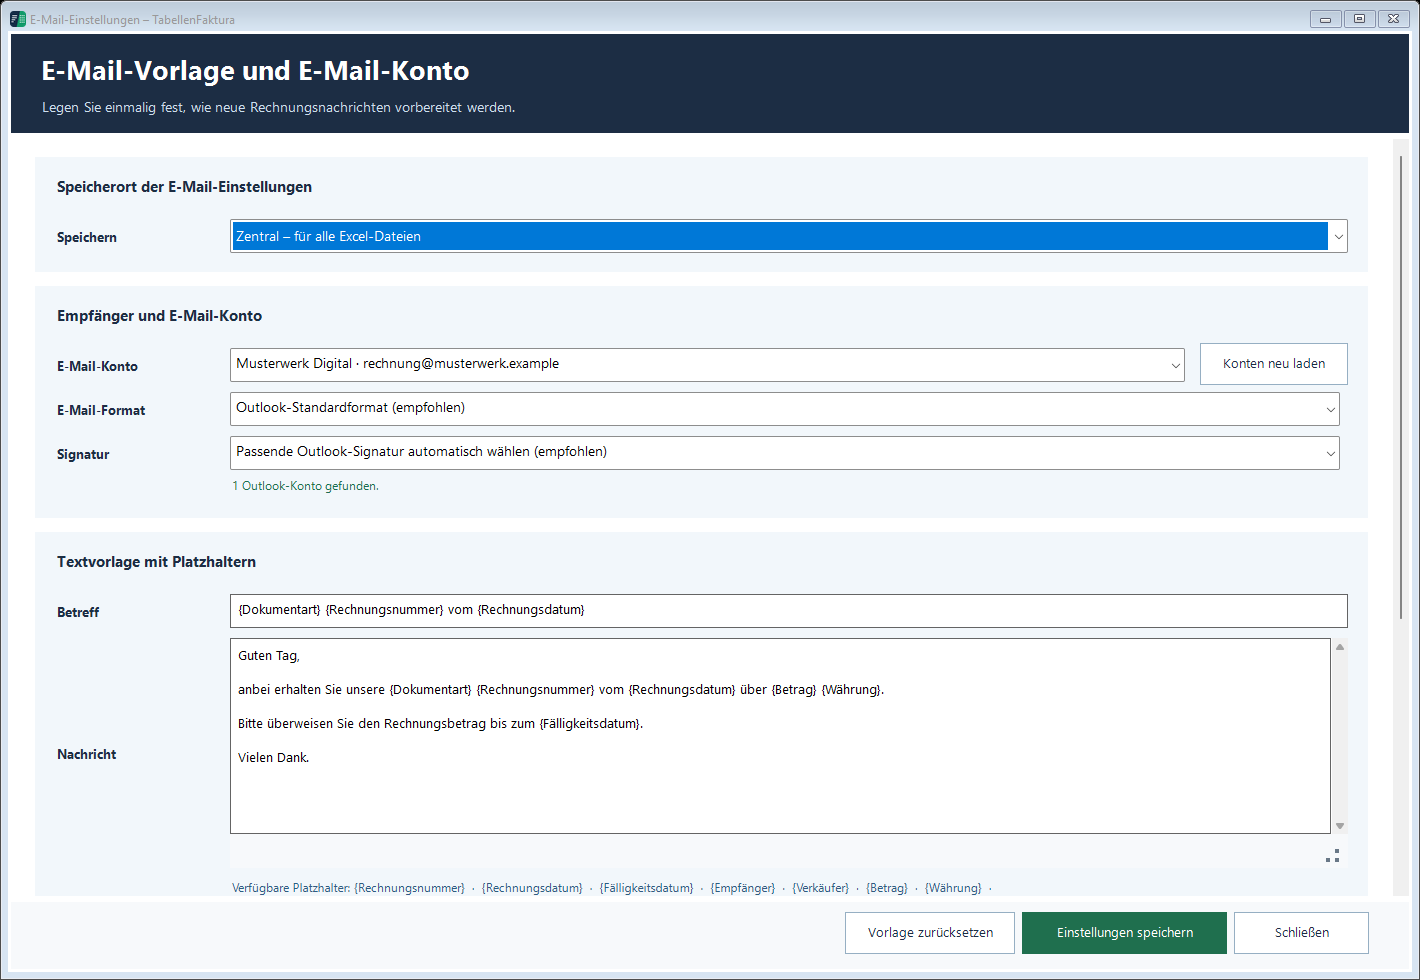
Placeholders remain in the template including the curly brackets. {Rechnungsnummer}, {Rechnungsdatum}, {Fälligkeitsdatum}, {Empfänger}, {Verkäufer}, {Betrag}, {Währung}, {Dokumentart}, {Leitweg-ID} and {Dateiname}.
One possible subject is: {Dokumentart} {Rechnungsnummer} vom {Rechnungsdatum}. The buyer email in the field assignment is the later recipient address; the seller email is an invoice statement. The selected Outlook account, however, determines the sender of the draft.